


Overclocking profiles basics
In this article, we’ll dive deeper into fine-tuning your worker with Overclocking Templates.
Disclaimer: Any settings that deviate from factory values may cause your system to become unstable. Use at your own risk.
Why overclock and how much profit can it give?
Overclocking graphics cards is a common practice among miners. Why? It makes the graphics card more efficient in mining a particular cryptocurrency and lowers the power consumption. Both of these things are desirable in cryptocurrency mining as they help to maximize profits.
Base memory overclocking is insufficient in most consumer graphics cards to mine such cryptocurrencies at full performance, as the core is more useful in games than memory. So by performing graphics card overclocking, we can often significantly increase the performance of the graphics card in cryptocurrency mining, up to 30% depending on the cryptocurrency, while lowering the power consumption.
Is overclocking dangerous?
Sounds too good to be true? While manufacturers like EVGA, Gigabyte, MSI, PowerColor, XFX, and Zotac do not void the warranty if you overclock, other manufacturers like Inno3D, Gainward, KFA, and PNY may void the warranty. To be sure if your card manufacturer allows overclocking while not voiding the warranty, read the product warranty terms and conditions for the graphics card you purchased.
However, even if voiding your warranty is not important to you, keep in mind that overclocking may shorten the lifespan of your graphics card. Setting overclocking too aggressively can lead to excessively high graphics card operating temperatures, which in turn leads to chip degradation and, in extreme cases, failure. Therefore, try to ensure low operating temperatures. The Hiveon OS Autofan feature can help you with this. You can read more about it here.
What is an Overclocking Template
In general terms, overclocking is pushing your hardware beyond its factory specs, thus possibly improving its performance. You can also use an Overclocking Template for other purposes, like downvolting — reducing your hardware’s power consumption. There are many applications for overclocking and we’ll try to cover some of them in this article.
Overclocking is a process of trial and error and requires patience to achieve the desired results. You should always let your hardware run with each set of new Overclocking Templates for some time to see if those specific parameters will stay stable. Hardware can behave differently, sometimes giving out unpredictable results. One way to see if your overclocking changes were successful is whether you get rejected shares.
An example of the rejected shares:
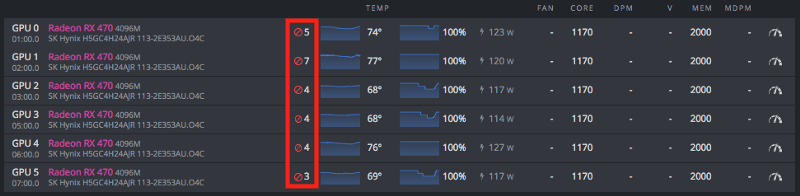
Rejected shares — shares that your miner worked, but they were either not submitted in time to be included in the block or they had an error. The most common reason for a large amount of rejected shares is because of overclocking the GPU too much to the point where it produces faulty shares. The smaller the rate of rejected shares to be accepted, the higher the efficiency of your GPU’s Overclocking Template.
This said, most users leave their hardware at default settings as overclocking results may vary for each user. It also greatly depends on the actual components a manufacturer uses as some components are capable of being overclocked beyond spec and some simply don’t perform so great.
Creating an Overclocking Template
All Overclocking templates are created individually for each farm and can’t be shared across farms. You can either create a farm-wide template or a worker specific template. The worker specific settings will always override any farm-wide settings. For example, this way you can set the optimal desired settings for the entire farm and then fine-tune each rig individually
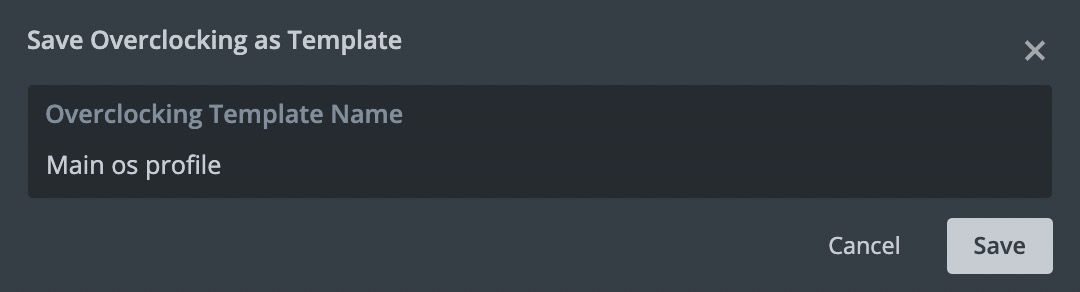
To add a new template, go to your farm’s Overclocking Templates tab and click Add OC template. In the Save Overclocking as Template window, name your profile and click Save.
The template is created and can be copied and modified for a different miner or algorithm combinations.
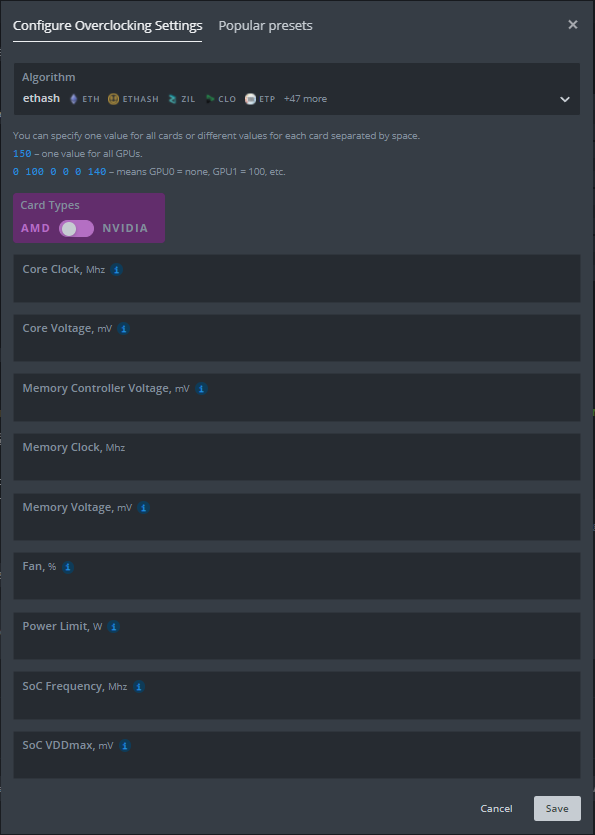
All your GPUs will use the template we created, but the settings are different for Nvidia and AMD. You can have separate sets of settings for both GPU types within the same template in case your rig is running both Nvidia and AMD GPUs and they will apply to each GPU type individually.
Please note that you can use the most popular presets by going to the Popular Presets tab and finding the model of your GPU.
Overclocking Nvidia GPUs
Before changing any settings, you can run the nvidia-smi command to find out your current GPU settings. To do this remotely from your dashboard, go to your worker and click Run Command in the toolbar at the top of the screen.

You can specify one value for all cards or list of values for each card separated by a space. For example:
150 — one value for all GPUs.
0 100 0 0 0 140 — means GPU0 = none, GPU1 = 100, etc.
Nvidia OC window
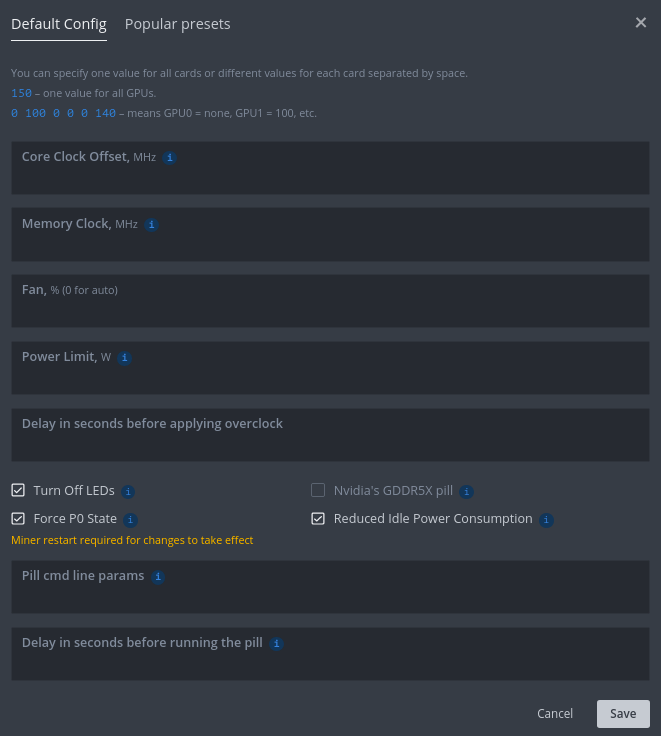
The Algo field is used to specify HiveOS overclock settings for a specific algorithm. You can create a separate set of overclock settings for each algorithm individually or choose the Default Config that will apply to all algorithms, but can be overwritten by the algorithm settings themselves.
-
+Core Clock (Mhz) — any value below 499 will be treated as an offset in this field. This increases the GPU’s core clock speed in Mhz. The minimum and maximum values for your GPU can be found in the Nvidia X Server Settings tool by going to the PowerMizer tab on your rig. 0 will always be the GPU’s default (factory) value.
-
Locked Core Clock(Mhz) — any value above 500 is treated as a locked core clock.
Lock Core Clockworks on GPUs since Volta family. This parameter locks the core clock, which allows you to get a more stable hashrate and at the same time lower power consumption. SuitableLock Core Clockvalues are divisible by 15 without a remainder, e.g. 900, 1035, 1200 etc. -
Memory (Mhz) — increases the GPU’s memory speed in Mhz. Usually this value is double from what you see in AfterBurner. For example, if in Windows it’s +800Mhz, then the value here should be 1600. The minimum and maximum values for your GPU can be found in the Nvidia X Server Settings tool by going to the PowerMizer tab.
-
Fan (%) — controls the speed of your GPU fan/fans. 0 will always be the GPU’s default (factory) value. Your GPU’s BIOS will determine the default speed of the fan, not the miner.
-
Power Limit (W) — controls the power consumption. These values must be absolute, unlike in AfterBurner, where the values are percentile. You can check your power limit values in your GPU list of the rig. For example, Power Limit 60.00 W, 120.00 W, 140.00 W means that the first value, 60.00 W — the minimum, 120.00 W — the default, and 140.00 W — the maximum. The setting won’t apply if your values are less or greater than the min/max values of your specific GPU.
-
Turn Off LEDs — this turns off the LED lights on your GPU, if there are any. This option may not work on some GPUs.
-
Nvidia’s GDDR5X pill — works only with Nvidia GTX 1080 series. Provided by OhGodACompany.
-
Force P0 State — P0 is a fixed maximum power mode. Note that it also raises the memory base clock by 400MHz, so keep this in mind when setting memory overclocking.
-
Reduced Idle Power Consumption — allows to reduce power consumption significantly during the idle time (when mining stops).
-
Pill cmd line params — (only if GDDR5X pill is enabled) - specify which device should be fed our senior solution, --revA 0,1,2,...
-
Delay in seconds before running the pill — (only if GDDR5X pill is enabled) - may help to prevent glitches on some 1080 cards, try to set this value to 120 or higher. For 1080 rev1 use a negative value, like -50.
-
Click Save and you’re done.
Example: Nvidia GTX 1060 Overclocking
Here’s an example of a HiveOS Overclocking Profile for an Nvidia GTX 1060 GPU.
Note, these values are for demonstrational purposes. Use at your own risk.
Nvidia OC example settings
-
Algo — we set it to the Default Config as we want it to apply to all algorithms
-
+Core Clock (Mhz) — 130
-
Memory (Mhz) — 2000
-
Fan (%) — left empty for default values
-
Power Limit (W) — 120
-
Turn Off LEDs — our GPU doesn’t have LEDs, so we skipped this setting
-
OhGodAnETHlargementPill — this is available only for the 1080 series GPUs, so we skipped this setting
-
Click Save.
_HiveOS reset overclock settings, just leave all the fields blank, and then click Save.
Overclocking AMD GPUs
Before changing any settings you can run the amd-info command to find out your current GPU settings. To do this remotely from your dashboard, go to your worker and click Run Command in the toolbar at the top of the screen.

You can specify one value for all cards or list of values for each card separated by a space. For example:
150 — one value for all GPUs.
0 100 0 0 0 140 — means GPU0 = none, GPU1 = 100, etc.
AMD OC window
The Algo field is used to specify Hiveon OS overclock settings for a specific algorithm. You can create a separate set of overclock settings for each algorithm individually or choose the Default Config that will apply to all algorithms, but can be overwritten by the algorithm settings themselves.
-
Core Clock (Mhz) — sets the core clock. A good value would be around 1100. If Core State is unset, then the default 5 state will be used to set the clock. All values must be absolute.
-
Core State (Index) — required if you try to undervolt your card. You should use this parameter in conjunction with Core Clock and Core Voltage settings. This is called a DPM (Dynamic Power Management) or “Power Level” of a GPU core. For RX GPUs it’s a value from 1 to 7. The default DPM HiveOS settings are set to 5. Decrease the value to downvolt. If you decide to set one of the default states, then you don’t need to set any values in Core Clock and Core Voltage.
-
Core Voltage (mV) — required if you try to undervolt your GPU. And you must set Core State or default 5 state will be used to set the voltage. You can set values like 900 meaning mV or values like 65284 from the VBIOS table.
-
Memory Clock (Mhz) — sets the memory clock speed. All values are absolute.
-
Mem State (Index) — a very advanced parameter. Change this if there are issues with undervolting. If everything works within spec — don’t change this value. RX cards are known to have 1 or 2 memory states (3 including 0 — idle state). By default, the highest state will be selected. But some rare cards are known to fail to undervolt on the highest state and are required to select a lower one. For example, the highest is 2 and for undervolting you would want to set the state to 1. You should use this parameter with the Memory Clock setting.
-
Fan (%) — for setting the fan speed. Keep in mind, miners like Claymore will still control the fan speed. You must disable fan control in miner configuration for this to work. We advise to leave this field empty if you have AutoFan turned on. We will write more on AutoFan in our future articles.
-
Aggressive undervolting — chooses a set overclocked parameter for each DPM state.
-
Click Save.
Example: AMD RX 580 Overclocking
Here’s an example of an Overclocking Template for an AMD RX 580 GPU.
Note, these values are for demonstrational purposes. Use at your own risk.

AMD OC example settings
Click Save.
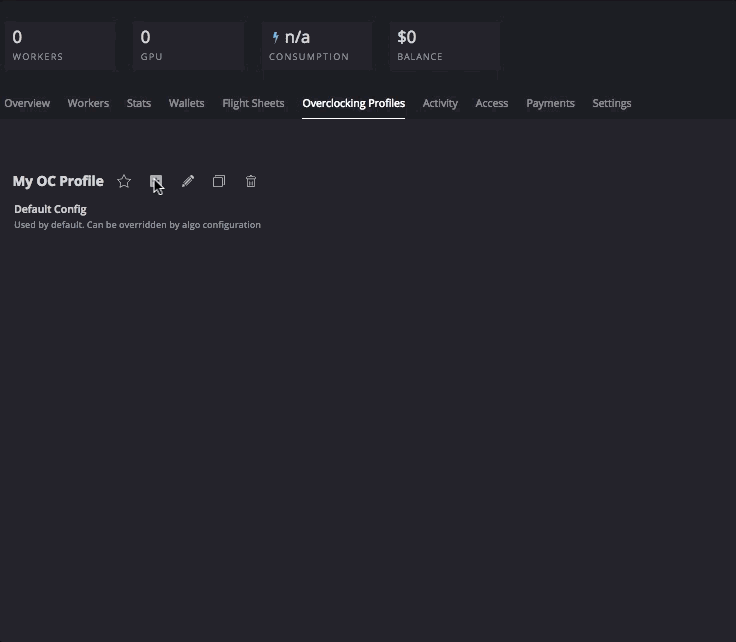
Applying an Overclocking Template
You can now apply the Overclocking Template you’ve created by going to the Workers tab, then clicking the checkboxes on the left side of the workers to which you want to apply the Overclocking Template. You should see a speedometer icon appear in the menu bar in the top right corner.

Click the icon and select the necessary Overlocking Template from the list.
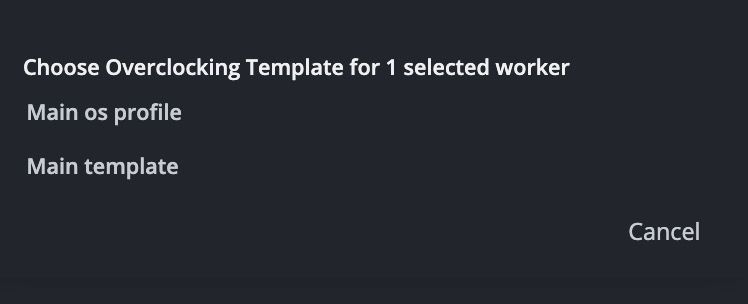
Choose the Overclocking Template you want to apply and click Apply. You should see a message telling you that the Overclocking command was sent to the worker. In a few seconds, your workers should apply the changes.
FAQ
What is overclocking?
GPU overclocking is the process of increasing the speed, and at the same time the performance, of a graphics card by increasing its clock frequencies using appropriate software. It is a common technique used by cryptocurrency miners. Hiveon OS allows you to overclock your graphics card from a graphical worker management panel in both the Web Interface and the mobile app.
Hiveon OS makes overclocking easier with the Popular presets tab. There you can check the most commonly used community overclocking settings. The HiveOS cardinality number, which displays next to each of these presets, indicates how often a particular OC setting is used by Hiveon OS users.
What is DPM?
DPM (or “Power Level”) on AMD graphics cards is a table of core frequencies and corresponding voltages for those frequencies. According to this table, the graphics card adjusts the core frequencies. It is in the miners' interest to lower these voltages as much as possible as long as the graphics card stably mines cryptocurrencies, as this will lower the power consumption. This will not only translate into lower power bills but also lower operating temperatures for the graphics card. By default, if HiveOS DPM settings are not set otherwise, DPM is set to 5.
What is an overclocking template?
Overclocking template in Hiveon OS is a method to apply the desired overclocking every time you boot up the rig automatically. By setting HiveOS overclocking profiles, you can increase your graphics card's performance in mining cryptocurrencies, reduce its power consumption and lower its operating temperatures.

