


How to create a wallet and a flight sheet, and to start mine in Hiveon OS
You have installed Hiveon OS and merged your devices into a farm. What's the next step? To start mining, you need to create a wallet and flight sheet, which will determine what, where, how and under what parameters to mine. It's very simple — you just need to follow this instruction.
Wallet creation
Step 1: log in to your Hiveon OS account
Step 2: go to the Wallets tab
Step 3: click the Add wallet button
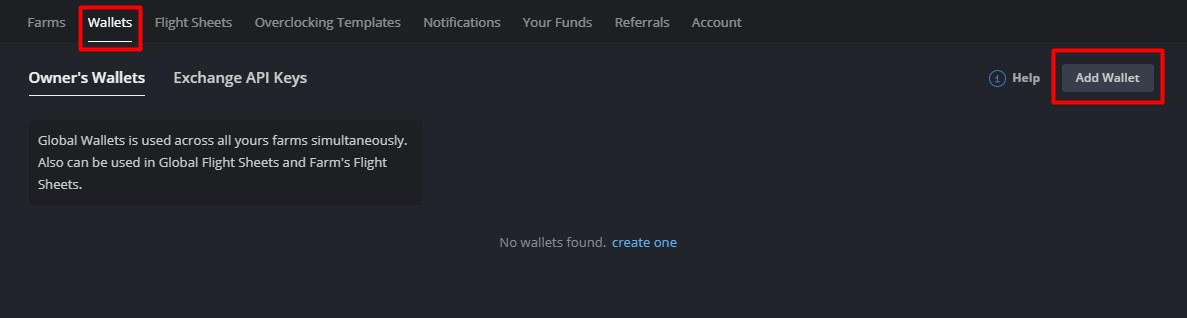
Step 4: you will see the following window:
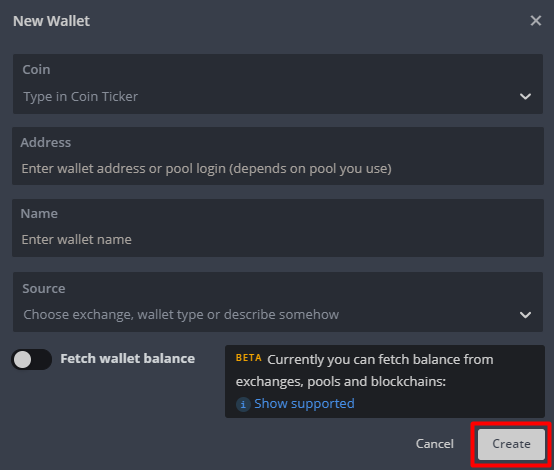
Step 5: fill in the following fields:
-
Coin (select the ticker of the coin you want to mine). To find the ticker you want faster, you can start typing it in the search field — this also works for coin and pool selection when creating a flight sheet.
-
Address (the address where you originally created the wallet — for example, on the exchange).
-
Name (enter a suitable name to easily distinguish this wallet from others — this will be helpful in case you plan to create many wallets).
-
Source (select an exchange or type of a wallet — this field is optional, you can leave it empty).
Step 6: click the Create button
That’s it, your wallet is created!
Flight sheet creation
Flight sheets are sets of settings for your devices, different combinations of wallets, coins, pools and miners. In Hiveon OS you can create any number of flight sheets and then quickly apply them to your workers to increase mining efficiency and your income. Switching between flight sheets takes only a few clicks. To create a flight sheet, follow these steps:
Step 1: move to the Flight Sheets tab (it is located to the right of the Wallets tab)
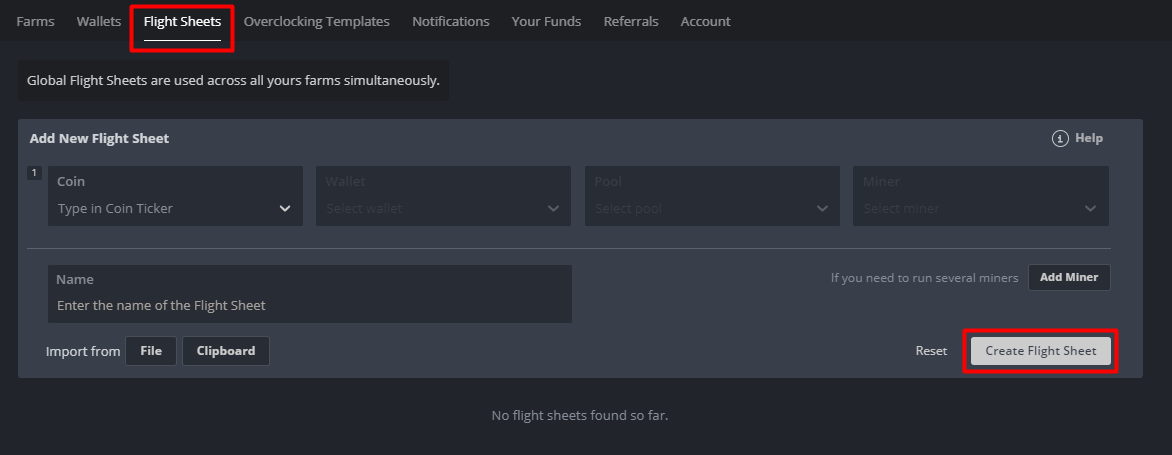
Step 2: in a new window, fill in the following fields:
-
Coin (select the ticker of the coin you want to mine).
-
Wallet (select the wallet to which the funds will be transferred — after you select a coin, in the drop-down list of wallets you will see only those of them that were created for the same cryptocurrency).
-
Pool (select the pool you plan to mine on). After selecting the pool, an additional window will appear — there you can configure the order of server selection. We recommend choosing several servers — if the connection with the first server is lost, your workers will automatically connect to the next one. The first server on the list should be that one that is geographically closer to you. Please note that if the pool you need is not there, then you should select the Configure in miner option at the very bottom of the list.
-
Miner (select a miner — only those miners will be available for which there are ready-made configuration templates for this coin and the selected pool). You can scroll down and click the Show all button to display all options and configure the miner manually.
-
Name (this field is optional, but we recommend filling it in — this will make it easier for you to distinguish this flight sheet from others).
Step 3: click the Create Flight Sheet button
That’s it!
Optional: setting up miner configuration
Filling in the parameters in the Setup miner config window is an optional step — you will have to take it only in case you are going to reconfigure or add any specific parameters (for example, to set the pool address when configuring the pool manually).
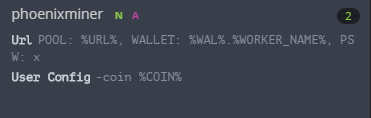
In the fields you can use the following macro substitutions:
-
%URL% — pool or the entire list specified during the pool selection, the format is host_name:port_number
-
%URL_HOST% — part of the pool name (host name), is used in certain miners
-
%URL_PORT% — part of the pool name (port number), is used in certain miners
-
%WAL% — the wallet specified in the flight sheet
-
%WORKER_NAME% — worker name matching your device name
-
%COIN% — the ticker of the coin selected for mining (can be used in some miners)
The “set” of fields in this window depends on the selected miner. You can use hints by hovering over the ℹ️ icon. There you will see the format and examples of use. The text written in blue will be inserted into the input field automatically when you click.
For instance, if you select SG miner, the fields will be the following:
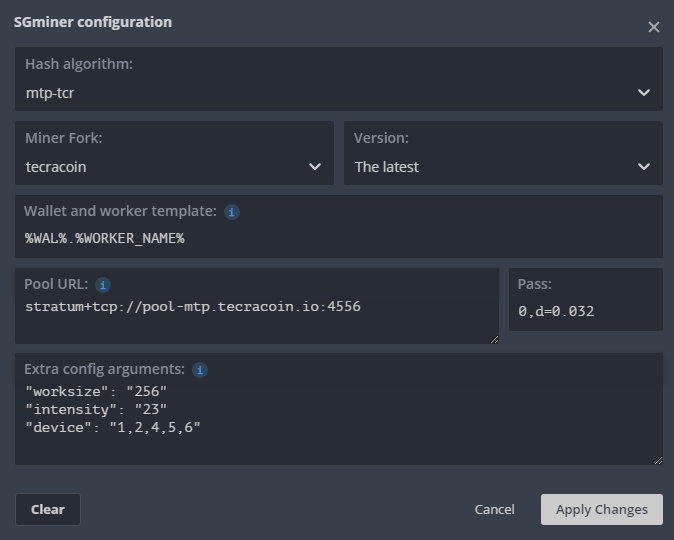
-
Hash algorithm. This field is available for those miners that support more than 1 algorithm.
-
Miner fork. This field appears if you have selected a miner with the build implemented on the basis of this miner, and any specific algorithm (or algorithms). All other configuration parameters, log files and the miner's API remain unchanged, or differ very insignificantly.
-
Version. By default, the most recent version of the miner is always used, but you can choose any other in this field.
-
Wallet and worker template. Here you can enter a wallet or username for pools with registration, and specify the name of the worker (usually with a dot — this is necessary to identify the worker on the pool).
-
Pool URL. If necessary, you can specify the address of the pool in this field. Note that for templates, the field is usually set to %URL%, and the pool and its backup addresses are pulled from the pool settings.
-
Pass. There are several things you can do here, everything depends on the pool. For example, you can set the name of the worker, the pool difficulty, the password for changing the threshold of payments on the pool, and so on.
-
Extra config arguments (use the ℹ️ hint to see the format for specifying argument parameters). Here you can indicate specific parameters — for example, to choose which cards will be used for mining (refer to the miner's documentation for a complete list of available parameters).
If you make any changes, click the Apply changes button to save them.
How to start mine in Hiveon OS?
So you're ready to start mining! All that remains is to apply the flight sheet to your devices. There are two ways to do this.
The first method is useful if you want to apply a flight sheet to a specific worker.
Step 1: enter the farm and go to the Workers tab
Step 2: select the required device

Step 3: in the worker menu select the Flight sheets tab
Step 4: click the rocket icon on the right side of the flight sheet that you want to apply to your device

If you want to apply the flight sheet to several devices at once, just check several of them. Then click the rocket icon in the Flight Sheets tab.
After you click the icon, a new window will appear with all selected devices and a list of all the available flight sheets. Select one of them and click the Apply button.
That's all! In a few minutes your workers will start to mine and bring you income. Also, you can always check how many devices the flight sheet is being applied to. Just click the required flight sheet, and the number will be displayed in the upper right corner, in a green circle:
As you can see, it is very easy to create a wallet and a flight sheet. But if you still have any questions, do not hesitate to get in touch with us — we are always ready to help.
Mine easily and profitably with Hiveon OS!

